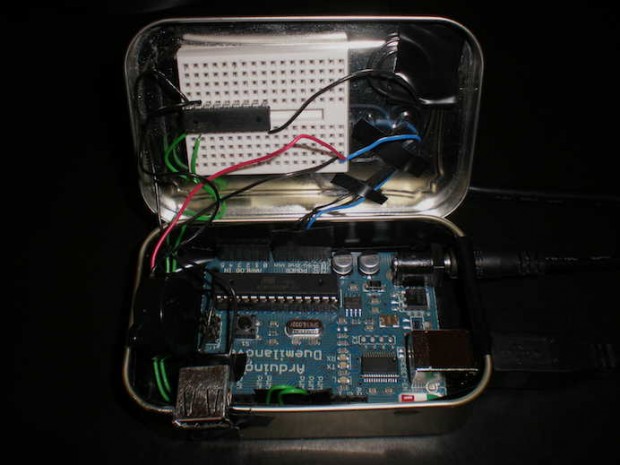
I’ve been in the mood for some hardware hacking for a while. Recently at work I thought it would be nice to have a way to know if an important (emergency) email came in that required attention. These fire-drills are just part of the job. I have multiple computers and screens so an on-screen alert isn’t always effective. Audible alerts don’t work either because speakers are only connected to one computer at a time and often headphones are plugged in. I need something more independent.
My solution was to build a USB alarm system: Two rotating LED lights to get attention visually as well as a 76 db piezo buzzer which chirps when the system is activates to help get attention. The buzzer only chirps and only when the system first invokes so it’s not an annoyance. It’s enough to get attention, but not enough to bother others. It has multiple chirps so that I can potentially setup multiple alert types.
Now we can really be on the ball!

Obligatory goofy office signage
Parts Manifest
- 1 Arduino Duemilanove
- 1 Piezo Buzzer (I used RadioShack part# 273-059 but you can use whatever you’ve got)
- 1 set of Woot Lights
- 1 Breadboard
- 1 ULN2803A Darlington Transistor Array
- 1 9V DC Power Supply
- 1 USB Female Type A Connector
- 1 Altoids Tin to hold everything
- 1 USB cable
Plus misc. wire to hold it all together, Dremel to cut the tin, multimeter to test your work, soldering iron to wire up the USB connector, electrical tape wrap all sharp corners and protect the inside from shorts.

Description
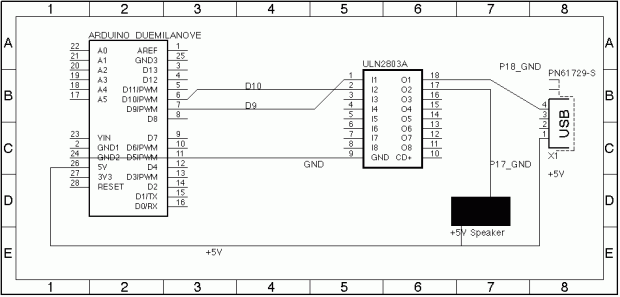
Essentially I started with Brett’s simple Woot-Off Schematics (mirrored). I made a few changes to meet my needs. I added a Piezo Buzzer to Pin 2/17 on the Darington Transistor Array and connected it Pin 8 on the Arduino. To avoid needing to modify the USB powered lights, I decided to wire up a USB connector using pins 1 and 4 (see pinout). This made installation logistics easier for me and also looks cleaner and more professional.
Here’s what the schematics look like (click for a bigger version). This is my first attempt at schematics, so pardon the sloppiness.

From there I put together a pretty simple sketch (download below) and uploaded it to the Arduino. Essentially it looks for one of three inputs via serial: 0, 1, 2. 0 turns the alarm off. 1 and 2 turn on the lights and audible tone. The sole difference is the tone is slightly different between the two, this helps differentiate between different events. I could setup an infinite number of alarms. Right now the code is pretty simple and limited to two, but I could expand and put together an algorithm to calculate X tones.
After that I wrote a quick Python script (requires pySerial) to send commands to the Arduino. I then wrote a batch script essentially as a wrapper (all available below).
So how is this invoked? I simply setup an Outlook filter to sniff find emails that meet the criteria for setting off an alarm and make it run an application, in my case the batch file.
Now when I get an email that meets the standards of setting off an alarm, I literally set off an alarm.
The version I use has a conditional in the Python script to check the day of the week and the time so the alarm doesn’t go off in the middle of the night since that’s pretty pointless. The one below is 24×7. You can modify it to suite you’re needs.
Where to go from here?
I’m contemplating upgrading to a brighter set of LED’s for more visibility. That would be simple enough to do.
It’s also possible to write a python script that monitors something on the web then fires off an alarm when a certain criteria is met. It would be pretty trivial to do. I may do this for an internal tool or two.
For anyone wondering, technically you could use this to build a remotely operated USB Humping Dog or to control any other “usb powered” dumb device. By “dumb” I mean no data connection.
Code
Arduino USB Alarm Controller sketch
Python script (requires pySerial to be installed) + Windows Batch Scripts
